안녕하세요. J4J입니다.
이번 포스팅은 다중 DB 및 다중 개발환경에서 JNDI 설정하는 방법에 대해 적어보는 시간을 가져보려고 합니다.
이전 포스팅에서는 jndi를 이용한 가장 기본적인 환경 구성에 대해 다뤘었습니다.
이번에는 한 번에 여러 개의 데이터베이스에도 연결되고 또한 동일한 코드로 개발/운영 환경에 맞는 데이터베이스 접속될 수 있도록 설정을 해보겠습니다.
다중 DB 같은 경우는 jndi 설정을 위한 resource를 여러 개를 등록한 뒤 각각의 resource와 매핑되는 rootContext 설정을 해 볼 예정입니다.
개발/운영 환경을 구분하는 것은 profile을 이용하여 설정해 볼 예정입니다.
참고적으로 설정 부분만 끄집어내기에는 애매하다고 생각되어서 MyBatis를 이용하여 설정하는 방법을 A-Z까지 보여드리도록 하겠습니다.
데이터베이스 설정
-- 개발 jndi1
create database devjndi1;

use devjndi1;

create table student (
    name varchar(50),
    age int,
    score int
);

insert into student values ('학생 가', 13, 68);
insert into student values ('학생 나', 14, 63);

-- 개발 jndi2
create database devjndi2;

use devjndi2;

create table school (
    name varchar(50),
    region varchar(50),
    ranking int
);

insert into school values ('학교 가', '서울', 1);
insert into school values ('학교 나', '경기', 2);

-- 운영 jndi1
create database prodjndi1;

use prodjndi1;

create table student (
    name varchar(50),
    age int,
    score int
);

select * from student;

insert into student values ('student a', 10, 35);
insert into student values ('student b', 17, 89);

-- 운영 jndi2
create database prodjndi2;

use prodjndi2;

create table school (
    name varchar(50),
    region varchar(50),
    ranking int
);

insert into school values ('school a', 'LA', 1);
insert into school values ('school b', 'NY', 2);
프로젝트 생성 및 maven 설정
[ 1. starter project 생성 정보 ]

[ 2. Next 클릭 후 dependency 추가 ]
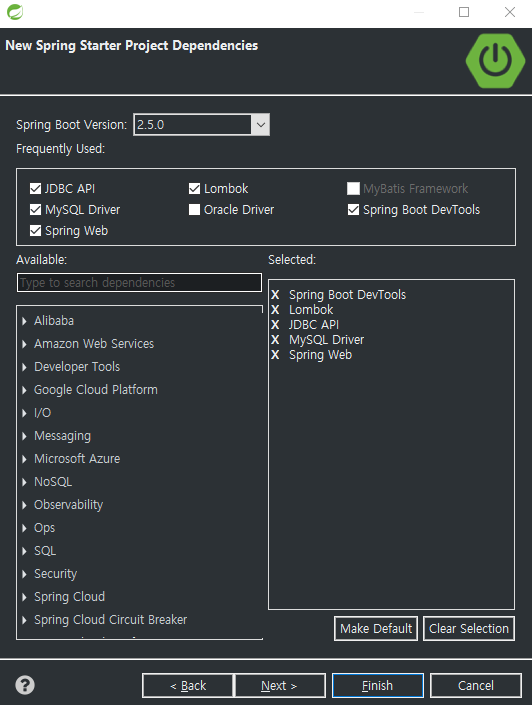
MyBatis가 갑자기 체크가 안돼서 생성하고 따로 추가하도록 하겠습니다.
[ 3. pom.xml에 dependency 추가 ]
<!-- MyBatis -->
<dependency>
  <groupId>org.mybatis.spring.boot</groupId>
  <artifactId>mybatis-spring-boot-starter</artifactId>
  <version>2.1.4</version>
</dependency>

<!-- jndi설정을 위한 dbcp -->
<dependency>
  <groupId>org.apache.commons</groupId>
  <artifactId>commons-dbcp2</artifactId>
</dependency>
profile 설정
[ 1. application-dev.properties 생성 (classpath:application-dev.properties) ]
# 만들기만 해주면 됩니다.
[ 2. application-prod.properties 생성 (classpath:application-prod.properties) ]
# 만들기만 해주면 됩니다.
config 파일
[ 1. 개발환경에 사용되는 DB Resource 등록 (com.spring.jndi.config.devDataSource) ]
package com.spring.jndi.config;

import org.apache.catalina.Context;
import org.apache.catalina.startup.Tomcat;
import org.apache.tomcat.util.descriptor.web.ContextResource;
import org.springframework.boot.web.embedded.tomcat.TomcatServletWebServerFactory;
import org.springframework.boot.web.embedded.tomcat.TomcatWebServer;
import org.springframework.context.annotation.Bean;
import org.springframework.context.annotation.Configuration;
import org.springframework.context.annotation.Profile;

@Configuration
@Profile("dev") // dev profile에만 적용
public class devDataSource {

	@Bean
	public TomcatServletWebServerFactory tomcatFactory() {
		return new TomcatServletWebServerFactory() {
			@Override
			protected TomcatWebServer getTomcatWebServer(Tomcat tomcat) {
				tomcat.enableNaming();
				return super.getTomcatWebServer(tomcat);
			}

			@Override
			protected void postProcessContext(Context context) {
				// 개발 jndi1
				context.getNamingResources().addResource(getResource("jndi1", "com.mysql.cj.jdbc.Driver", "jdbc:mysql://localhost:3306/devjndi1?serverTimezone=UTC", "root", "root"));

				// 개발 jndi2
				context.getNamingResources().addResource(getResource("jndi2", "com.mysql.cj.jdbc.Driver", "jdbc:mysql://localhost:3306/devjndi2?serverTimezone=UTC", "root", "root"));
			}
		};
	}

	public ContextResource getResource(String name, String driverClassName, String url, String username, String password) {
		ContextResource resource = new ContextResource();
		resource.setName(name); // 사용될 jndi 이름
		resource.setType("javax.sql.DataSource");
		resource.setAuth("Container");
		resource.setProperty("factory", "org.apache.commons.dbcp2.BasicDataSourceFactory");

		// datasource 정보
		resource.setProperty("driverClassName", driverClassName);
		resource.setProperty("url", url);
		resource.setProperty("username", username);
		resource.setProperty("password", password);

		return resource;
	}
}
[ 2. 운영환경에 사용되는 DB Resource 등록 (com.spring.jndi.config.prodDateSource) ]
package com.spring.jndi.config;

import org.apache.catalina.Context;
import org.apache.catalina.startup.Tomcat;
import org.apache.tomcat.util.descriptor.web.ContextResource;
import org.springframework.boot.web.embedded.tomcat.TomcatServletWebServerFactory;
import org.springframework.boot.web.embedded.tomcat.TomcatWebServer;
import org.springframework.context.annotation.Bean;
import org.springframework.context.annotation.Configuration;
import org.springframework.context.annotation.Profile;

@Configuration
@Profile("prod") // prod profile에만 적용
public class prodDataSource {

	@Bean
	public TomcatServletWebServerFactory tomcatFactory() {
		return new TomcatServletWebServerFactory() {
			@Override
			protected TomcatWebServer getTomcatWebServer(Tomcat tomcat) {
				tomcat.enableNaming();
				return super.getTomcatWebServer(tomcat);
			}

			@Override
			protected void postProcessContext(Context context) {
				// 운영 jndi1
				context.getNamingResources().addResource(getResource("jndi1", "com.mysql.cj.jdbc.Driver", "jdbc:mysql://localhost:3306/prodjndi1?serverTimezone=UTC", "root", "root"));

				// 운영 jndi2
				context.getNamingResources().addResource(getResource("jndi2", "com.mysql.cj.jdbc.Driver", "jdbc:mysql://localhost:3306/prodjndi2?serverTimezone=UTC", "root", "root"));
			}
		};
	}

	public ContextResource getResource(String name, String driverClassName, String url, String username, String password) {
		ContextResource resource = new ContextResource();
		resource.setName(name); // 사용될 jndi 이름
		resource.setType("javax.sql.DataSource");
		resource.setAuth("Container");
		resource.setProperty("factory", "org.apache.commons.dbcp2.BasicDataSourceFactory");

		// datasource 정보
		resource.setProperty("driverClassName", driverClassName);
		resource.setProperty("url", url);
		resource.setProperty("username", username);
		resource.setProperty("password", password);

		return resource;
	}
}
[ 3. jndi1 RootContext 설정 (com.spring.jndi.config.Jndi1RootContext) ]
package com.spring.jndi.config;

import java.io.IOException;

import javax.sql.DataSource;

import org.mybatis.spring.SqlSessionFactoryBean;
import org.mybatis.spring.annotation.MapperScan;
import org.springframework.context.annotation.Bean;
import org.springframework.context.annotation.ComponentScan;
import org.springframework.context.annotation.Configuration;
import org.springframework.core.io.support.PathMatchingResourcePatternResolver;
import org.springframework.jdbc.datasource.DataSourceTransactionManager;
import org.springframework.jdbc.datasource.lookup.JndiDataSourceLookup;
import org.springframework.transaction.PlatformTransactionManager;
import org.springframework.transaction.annotation.EnableTransactionManagement;

@Configuration
@MapperScan(basePackages = {"com.spring.jndi1.**.repository"} /* 사용될 repository 경로 */, sqlSessionFactoryRef = "jndi1SqlSessionFactory")
@ComponentScan(basePackages = {"com.spring.jndi1.**.service"}) // 사용될 service 경로
@EnableTransactionManagement
public class Jndi1RootContext {

	// dataSource 설정
	@Bean
	public DataSource jndi1DataSource() {
		JndiDataSourceLookup jndiDataSourceLookup = new JndiDataSourceLookup();
		return jndiDataSourceLookup.getDataSource("java:comp/env/jndi1"); // java:comp/env/{jndi이름}
	}

	// sqlSessionFactory 설정
	@Bean
	public SqlSessionFactoryBean jndi1SqlSessionFactory() throws IOException {
		SqlSessionFactoryBean jndi1SqlSessionFactory = new SqlSessionFactoryBean();
		jndi1SqlSessionFactory.setDataSource(jndi1DataSource());
		jndi1SqlSessionFactory.setConfigLocation(new PathMatchingResourcePatternResolver().getResource("classpath:mybatis-config.xml")); // mybatis 설정 파일
		jndi1SqlSessionFactory.setMapperLocations(new PathMatchingResourcePatternResolver().getResources("classpath:mapper/jndi1/**/*.xml")); // 사용될 mapper 경로

		return jndi1SqlSessionFactory;
	}

	// transaction 설정
	@Bean
	PlatformTransactionManager jndi1TransactionManager() {
		DataSourceTransactionManager jndi1TransactionManager = new DataSourceTransactionManager();
		jndi1TransactionManager.setDataSource(jndi1DataSource());

		return jndi1TransactionManager;
	}
}
[ 4. jndi2 RootContext 설정 (com.spring.jndi.config.Jndi2RootContext) ]
package com.spring.jndi.config;

import java.io.IOException;

import javax.sql.DataSource;

import org.mybatis.spring.SqlSessionFactoryBean;
import org.mybatis.spring.annotation.MapperScan;
import org.springframework.context.annotation.Bean;
import org.springframework.context.annotation.ComponentScan;
import org.springframework.context.annotation.Configuration;
import org.springframework.core.io.support.PathMatchingResourcePatternResolver;
import org.springframework.jdbc.datasource.DataSourceTransactionManager;
import org.springframework.jdbc.datasource.lookup.JndiDataSourceLookup;
import org.springframework.transaction.PlatformTransactionManager;
import org.springframework.transaction.annotation.EnableTransactionManagement;

@Configuration
@MapperScan(basePackages = {"com.spring.jndi2.**.repository"} /* 사용될 repository 경로 */, sqlSessionFactoryRef = "jndi2SqlSessionFactory")
@ComponentScan(basePackages = {"com.spring.jndi2.**.service"}) // 사용될 service 경로
@EnableTransactionManagement
public class Jndi2RootContext {

	// dataSource 설정
	@Bean
	public DataSource jndi2DataSource() {
		JndiDataSourceLookup jndiDataSourceLookup = new JndiDataSourceLookup();
		return jndiDataSourceLookup.getDataSource("java:comp/env/jndi2"); // java:comp/env/{jndi이름}
	}

	// sqlSessionFactory 설정
	@Bean
	public SqlSessionFactoryBean jndi2SqlSessionFactory() throws IOException {
		SqlSessionFactoryBean jndi2SqlSessionFactory = new SqlSessionFactoryBean();
		jndi2SqlSessionFactory.setDataSource(jndi2DataSource());
		jndi2SqlSessionFactory.setConfigLocation(new PathMatchingResourcePatternResolver().getResource("classpath:mybatis-config.xml")); // mybatis 설정 파일
		jndi2SqlSessionFactory.setMapperLocations(new PathMatchingResourcePatternResolver().getResources("classpath:mapper/jndi2/**/*.xml")); // 사용될 mapper 경로

		return jndi2SqlSessionFactory;
	}

	// transaction 설정
	@Bean
	PlatformTransactionManager jndi2TransactionManager() {
		DataSourceTransactionManager jndi2TransactionManager = new DataSourceTransactionManager();
		jndi2TransactionManager.setDataSource(jndi2DataSource());

		return jndi2TransactionManager;
	}
}
MyBatis 설정 및 Mapper 파일
[ 1. MyBatis 설정 파일 (classpath:mybatis-config.xml) ]
<?xml version="1.0" encoding="UTF-8" ?>
<!DOCTYPE configuration
  PUBLIC "-//mybatis.org//DTD Config 3.0//EN"
  "http://mybatis.org/dtd/mybatis-3-config.dtd">
<configuration>
	<settings>
		<setting name="mapUnderscoreToCamelCase" value="true"/> <!-- 카멜케이스 적용 -->
	</settings>

	<!-- alias 등록 -->
	<typeAliases>
		<typeAlias type="com.spring.jndi1.dto.StudentDto" alias="student"/>
		<typeAlias type="com.spring.jndi2.dto.SchoolDto" alias="school"/>
	</typeAliases>
</configuration>
[ 2. jnid1에서 사용되는 student mapper (classpath:mapper/jndi1/studentmapper.xml) ]
<?xml version="1.0" encoding="UTF-8" ?>
<!DOCTYPE mapper
  PUBLIC "-//mybatis.org//DTD Mapper 3.0//EN"
  "http://mybatis.org/dtd/mybatis-3-mapper.dtd">
<mapper namespace="com.spring.jndi1.repository.StudentRepository">
	<insert id="insert" parameterType="student">
		insert
		into student
		values (#{name}, #{age}, #{score})
	</insert>

	<select id="selectAll" resultType="student">
		select *
		from student
	</select>
</mapper>
[ 3. jnid2에서 사용되는 school mapper (classpath:mapper/jndi2/schoolmapper.xml) ]
<?xml version="1.0" encoding="UTF-8" ?>
<!DOCTYPE mapper
  PUBLIC "-//mybatis.org//DTD Mapper 3.0//EN"
  "http://mybatis.org/dtd/mybatis-3-mapper.dtd">
<mapper namespace="com.spring.jndi2.repository.SchoolRepository">
	<insert id="insert" parameterType="school">
		insert
		into school
		values (#{name}, #{region}, #{ranking})
	</insert>

	<select id="selectAll" resultType="school">
		select *
		from school
	</select>
</mapper>
DTO 및 Repository 파일
[ 1. jndi1에서 사용되는 student dto (com.spring.jndi1.dto.StudentDto) ]
package com.spring.jndi1.dto;

import lombok.AllArgsConstructor;
import lombok.Data;
import lombok.NoArgsConstructor;

@Data
@NoArgsConstructor
@AllArgsConstructor
public class StudentDto {
	private String name;
	private int age;
	private int score;
}
[ 2. jndi1에서 사용되는 student repository (com.spring.jndi1.repository.StudentRepository) ]
package com.spring.jndi1.repository;

import java.util.List;

import org.apache.ibatis.annotations.Mapper;

import com.spring.jndi1.dto.StudentDto;

@Mapper
public interface StudentRepository {

	public int insert(StudentDto studentDto);

	public List<StudentDto> selectAll();
}
[ 3. jndi2에서 사용되는 school dto (com.spring.jndi2.dto.SchoolDto) ]
package com.spring.jndi2.dto;

import lombok.AllArgsConstructor;
import lombok.Data;
import lombok.NoArgsConstructor;

@Data
@NoArgsConstructor
@AllArgsConstructor
public class SchoolDto {
	private String name;
	private String region;
	private int ranking;
}
[ 4. jndi2에서 사용되는 school repository (com.spring.jndi2.repository.SchoolRepository) ]
package com.spring.jndi2.repository;

import java.util.List;

import org.apache.ibatis.annotations.Mapper;

import com.spring.jndi2.dto.SchoolDto;

@Mapper
public interface SchoolRepository {

	public int insert(SchoolDto schoolDto);

	public List<SchoolDto> selectAll();
}
Service 파일
service단 같은 경우는 서로 구분되어 있는 jndi 환경에서 서로 다른 transaction 처리를 해줘야 합니다.
그렇기 때문에 저 같은 경우는 jndi1과 jndi2에서 service처리를 각각 해주고 jndi1과 jndi2가 통합적으로 모이는 service단으로 추가적으로 만들어 사용하는 편입니다.
구현하는 방법은 여러가지가 있기 때문에 다른 방법도 찾아보시길 추천드립니다.
[ 1. jndi1에서 사용되는 student service interface (com.spring.jndi1.service.StudentService) ]
package com.spring.jndi1.service;

import java.util.List;

import com.spring.jndi1.dto.StudentDto;

public interface StudentService {

	public int insertStudent(); // student 생성

	public List<StudentDto> selectStudentAll(); // student 조회
}
[ 2. 위의 service의 구현체 (com.spring.jndi1.service.StudentServiceImpl) ]
package com.spring.jndi1.service;

import java.util.List;

import org.springframework.beans.factory.annotation.Autowired;
import org.springframework.stereotype.Service;
import org.springframework.transaction.annotation.Transactional;

import com.spring.jndi1.dto.StudentDto;
import com.spring.jndi1.repository.StudentRepository;

@Service
@Transactional(transactionManager = "jndi1TransactionManager") // jndi1에 해당하는 transaction
public class StudentServiceImpl implements StudentService {

	@Autowired
	StudentRepository studentRepository;

	@Override
	public int insertStudent() {
		return studentRepository.insert(new StudentDto("히", 1, 2)) + studentRepository.insert1(new StudentDto("비", 1, 2));
	}

	@Override
	public List<StudentDto> selectStudentAll() {
		return studentRepository.selectAll();
	}
}
[ 3. jndi2에서 사용되는 school service interface (com.spring.jndi2.service.SchoolService) ]
package com.spring.jndi2.service;

import java.util.List;

import com.spring.jndi2.dto.SchoolDto;

public interface SchoolService {

	public int insertSchool(); // school 생성

	public List<SchoolDto> selectSchoolAll(); // school 조회
}
[ 4. 위의 service의 구현체 (com.spring.jndi2.service.SchoolServiceImpl) ]
package com.spring.jndi2.service;

import java.util.List;

import org.springframework.beans.factory.annotation.Autowired;
import org.springframework.stereotype.Service;
import org.springframework.transaction.annotation.Transactional;

import com.spring.jndi2.dto.SchoolDto;
import com.spring.jndi2.repository.SchoolRepository;

@Service
@Transactional(transactionManager = "jndi2TransactionManager") // jndi2에 해당하는 transaction
public class SchoolServiceImpl implements SchoolService {

	@Autowired
	SchoolRepository schoolRepository;

	@Override
	public int insertSchool() {
		return schoolRepository.insert(new SchoolDto("로", "라", 3));
	}

	@Override
	public List<SchoolDto> selectSchoolAll() {
		return schoolRepository.selectAll();
	}
}
[ 5. jndi1과 jndi2가 통합적으로 사용되는 education service interface (com.spring.jndi.service.EducationService) ]
package com.spring.jndi.service;

import java.util.List;

import com.spring.jndi1.dto.StudentDto;
import com.spring.jndi2.dto.SchoolDto;

public interface EducationService {

	public List<StudentDto> selectStudentAll(); // student 조회

	public List<SchoolDto> selectSchoolAll(); // school 조회

	public int insertAll(); // student, school 생성
}
[ 6. 위의 service의 구현체 (com.spring.jndi.service.EducationServiceImpl) ]
package com.spring.jndi.service;

import java.util.List;

import org.springframework.beans.factory.annotation.Autowired;
import org.springframework.stereotype.Service;

import com.spring.jndi1.dto.StudentDto;
import com.spring.jndi1.service.StudentService;
import com.spring.jndi2.dto.SchoolDto;
import com.spring.jndi2.service.SchoolService;

@Service
public class EducationServiceImpl implements EducationService {

	@Autowired
	StudentService studentService;

	@Autowired
	SchoolService schoolService;

	@Override
	public List<StudentDto> selectStudentAll() {
		return studentService.selectStudentAll();
	}

	@Override
	public List<SchoolDto> selectSchoolAll() {
		return schoolService.selectSchoolAll();
	}

	@Override
	public int insertAll() { // student와 school의 transaction 처리가 다름
		return studentService.insertStudent() + schoolService.insertSchool();
	}
}
Controller 파일
controller단은 단순하게 student와 school데이터를 확인할 수 있도록 해보겠습니다. (com.spring.jndi.controller.EducationController)
package com.spring.jndi.controller;
import java.util.HashMap;
import java.util.Map;
import org.springframework.beans.factory.annotation.Autowired;
import org.springframework.http.HttpStatus;
import org.springframework.http.ResponseEntity;
import org.springframework.web.bind.annotation.GetMapping;
import org.springframework.web.bind.annotation.RestController;
import com.spring.jndi.service.EducationService;
@RestController
public class EducationController {
@Autowired
EducationService educationService;
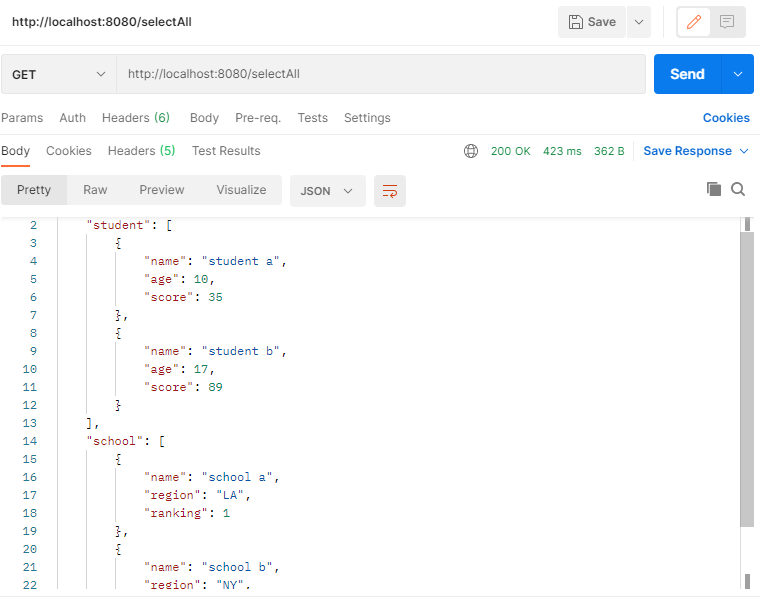
@GetMapping("/selectAll")
public ResponseEntity<Object> selectAll() {
Map<String, Object> resultMap = new HashMap<>();
resultMap.put("student", educationService.selectStudentAll());
resultMap.put("school", educationService.selectSchoolAll());
return new ResponseEntity<Object>(resultMap, HttpStatus.OK);
}
}
개발 환경 테스트
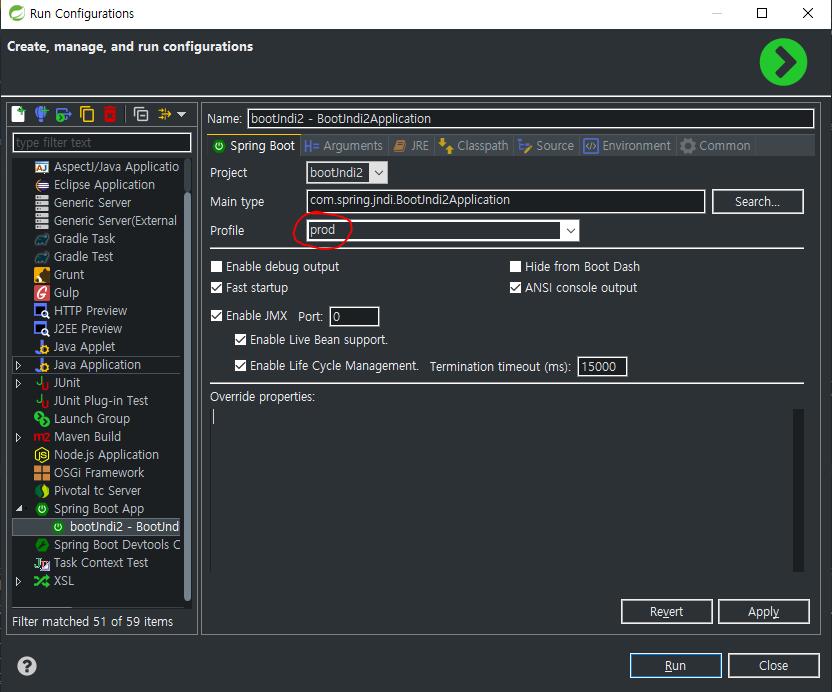
[ 1. profile 설정하여 프로젝트 실행 (프로젝트 우 클릭 → Run as → Run Configurations...) ]

[ 2. 포스트맨을 이용하여 데이터 조회 ]

운영 환경 테스트
[ 1. profile 설정하여 프로젝트 실행 ]
[ 2. 포스트맨을 이용하여 데이터 조회 ]
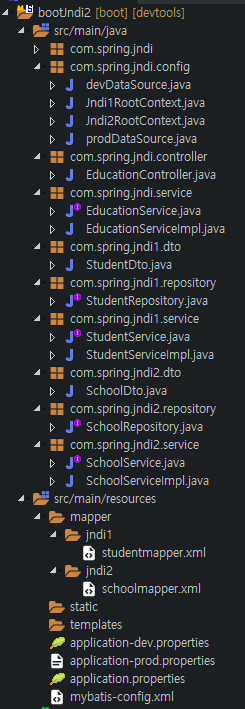
파일 구성
이상으로 다중 DB 및 다중 개발환경에서 JNDI 설정하는 방법에 대해 간단하게 알아보는 시간이었습니다.
읽어주셔서 감사합니다.
'Spring > SpringBoot' 카테고리의 다른 글
| [SpringBoot] 환경 변수 파일 사용하기 (0) | 2022.03.28 |
|---|---|
| [SpringBoot] GraphQL 설정 (0) | 2021.12.23 |
| [SpringBoot] 파일 다운로드 (0) | 2021.06.07 |
| [SpringBoot] 파일 업로드 - MultipartFile(With. React) (0) | 2021.05.27 |
| [SpringBoot] Boot환경에서 JNDI사용하기 (2) | 2021.05.17 |


댓글