안녕하세요. J4J입니다.
이번 포스팅은 apple 로그인 spring 활용하여 구현하는 방법에 대해 적어보는 시간을 가져보려고 합니다.
들어가기에 앞서
동일한 방식의 다른 서비스 로그인을 활용하는 방법에 대해 궁금하신 분들은 다음을 참고해 주시면 됩니다.
[Next] Kakao 로그인 Spring을 활용하여 구현하기
[Next] Naver 로그인 Spring을 활용하여 구현하기
Apple Developer 등록
[ 1. App Identifiers 추가하기 ]
Apple 로그인을 구현하기 위해서는 먼저 서비스로 사용될 App을 등록해줘야 합니다.
Apple Developer Identifiers에 접속한 뒤 + 버튼을 클릭해 줍니다.

[ 2. Identifiers 유형 선택 ]
어떤 유형을 등록할지 다음과 같이 나오는데 App IDs를 선택한 뒤 Continue를 클릭해 줍니다.

[ 3. type 선택 ]
type은 App을 선택하고 Continue를 클릭해 줍니다.

[ 4.Identifiers 정보 입력 ]
Description은 Identifiers의 이름이라고 생각하면 되고, Bundle ID는 XCode와 연동될 Bundle ID 값을 입력해 주시면 됩니다.
추가로 여기서 사용되는 App ID Prefix값은 코드 구현을 할 때 사용되니 정보를 보관해두셔야 합니다.

그리고 아래로 쭉 내려보면 Sign In with Apple이라는 항목이 보입니다.
해당 값을 선택해 주셔야 로그인 구현이 가능합니다.
선택이 완료되었다면 Continue 후 Register를 클릭해 줍니다.

[ 5. Service Identifiers 추가하기 ]
App 등록이 모두 완료되었다면 이번엔 Service Identifiers를 추가해 줍니다.
App 등록과 마찬가지로 Apple Developer Identifiers에 접속한 뒤 + 버튼을 클릭해 줍니다.

[ 6. Identifiers 유형 선택 ]
이번에는 유형을 Services IDs로 선택하고 Continue를 클릭해 줍니다.

[ 7. Identifiers 정보 입력 ]
Description은 위와 동일하게 Identifier 이름이라고 생각해 주시면 되고, Identifier는 key값이라고 생각하시면 됩니다.
여기서 입력되는 Identifier도 구현할 때 사용되니 정보를 보관해주셔야 합니다.
내용을 모두 입력하고 Continue 후 Register를 클릭해 줍니다.

[ 8. Sign In Configure 설정 ]
등록이 완료되면 목록에서 우측의 필터 값을 Services IDs로 변경하여 다음과 같이 등록한 Identifier를 확인할 수 있습니다.
등록한 Identifiers를 클릭하여 세부 정보로 들어가 줍니다.

그러면 다음과 같은 화면을 볼 수 있는데 여기서 Sign In with Apple의 Enabled 클릭하여 체크해 주고 Configure를 클릭해 줍니다.

[ 9. Configure 정보 입력 ]
먼저 App ID는 맨 처음에 등록했던 App을 선택해 주시면 됩니다.
그리고 도메인과 Apple 로그인이 이루어진 뒤 Redirect가 이루어질 URL을 다음과 같이 순서대로 입력해 주시면 됩니다.
여기서 주의해야 할 점은 Return URLs에는 SSL이 적용된 https로 시작하는 url이 등록되어야 하며 이 말은 로컬로 테스트가 불가능하다는 것입니다.
정보 입력이 완료되면 Next 후 Done을 클릭해 줍니다.
그러면 Configure 정보 입력은 완료되었으니 Continue 후 Save를 클릭하여 정보 수정을 완료해 줍니다.

[ 10. Key 추가하기 ]
이번엔 Keys로 넘어가서 Key를 추가해줘야 합니다.
아래처럼 접속한 뒤 +버튼을 클릭해 줍니다.

[ 11. Key 정보 입력 ]
먼저 Key Name에는 Key 이름을 입력해 줍니다.
그리고 아래에 있는 Sign in with Apple의 Enable를 클릭하여 체크해 주고 Configure를 클릭해 줍니다.

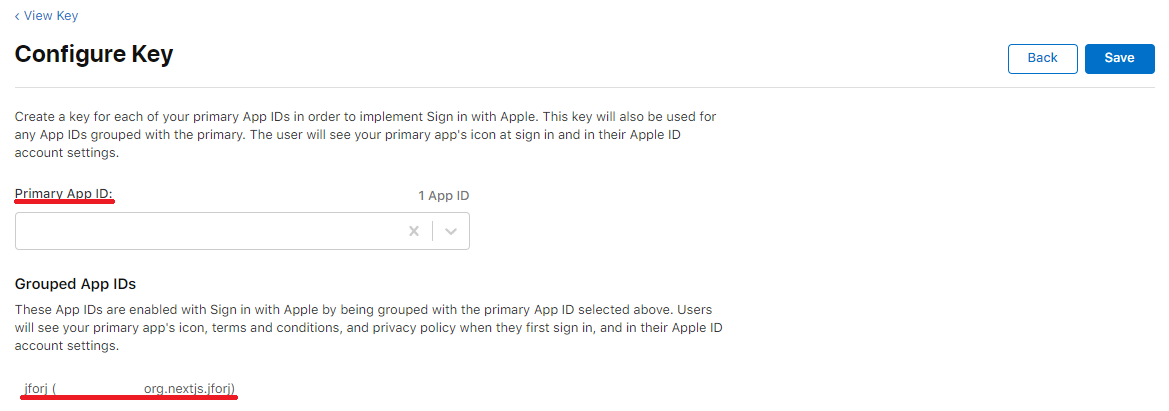
화면이 이동되면 App ID에 위에서 만든 App을 선택해 줍니다.
그러면 다음과 같이 Grouped App IDs에 위에서 등록했던 Service IDs도 같이 확인이 가능합니다.
선택이 완료되었다면 Save를 클릭하여 Configure 설정을 완료해 줍니다.
그런 뒤 Continue 후 Reigster를 클릭하여 Key 등록을 완료해 줍니다.

[ 12. Key 정보 저장 ]
모든 등록이 완료되면 다음과 같이 정보 확인이 가능합니다.
여기서 코드 구현을 할 때 필요한 것은 Key ID와 Download를 클릭했을 때 다운로드되는 p8 파일입니다.
위에 보관했던 정보들처럼 두 정보들도 따로 보관해 주시면 됩니다.

Next
위에서 등록한 정보들을 기반으로 Next의 코드를 작성해 보도록 하겠습니다.
[ 1. 패키지 설치 ]
$ npm install body-parser
$ npm install -D @types/body-parser
[ 2. 로그인 버튼 페이지 ]
로그인 버튼이 있는 페이지는 index에다가 코드를 작성하겠습니다.
import Head from 'next/head';

const Index = () => {
    /**
     * handle
     */
    const handle = {
        clickAppleLogin: () => {
            const client_id = 'org.nextjs.jforj'; // Service IDs 생성할 때 등록한 identifer
            const redirect_uri = 'https://jforj.store/apple/login'; // Service IDs 생성할 때 등록한 Return URLs

            // response_type (required) → 응답 유형을 선택, "code" or "code id_token"
            // response_mode (required) → 응답 모드를 선택, "query" or "fragment" or "form_post"
            // scope → 로그인을 통해 확인하고 싶은 정보를 선택, "email" or "name" or "email name" (scope를 사용할 경우 response_mode는 form_post가 필수)
            location.href = `https://appleid.apple.com/auth/authorize?response_type=code&response_mode=form_post&scope=email&client_id=${client_id}&redirect_uri=${redirect_uri}`;
        },
    };

    return (
        <>
            <Head>
                <title>apple login</title>
            </Head>

            <div>
                <button onClick={handle.clickAppleLogin}>애플 로그인</button>
            </div>
        </>
    );
};

export default Index;
[ 3. 리디렉트 페이지 ]
리디렉트 페이지는 Return URLs에 등록한 페이지입니다.
경로에 맞는 폴더구조와 함께 파일을 생성해 주신 뒤 다음과 같이 코드를 작성해 볼 수 있습니다.
import axios from 'axios';
import bodyParser from 'body-parser';
import { GetServerSideProps } from 'next';
import { useEffect } from 'react';
import { promisify } from 'util';

/**
 * getServerSideProps와 bodyParser을 이용하여 body 데이터 확인하기
 */
const getBody = promisify(bodyParser.urlencoded());

export const getServerSideProps: GetServerSideProps = async (context) => {
    await getBody(context.req, context.res);

    return {
        props: {
            body: (context.req as any)?.body,
        },
    };
};

/**
 * apple로부터 전달받은 body를 이용하여 api서버와 통신 후 로그인 처리하기
 */
interface AppleLogin {
    code: string;
}

interface Props {
    body: any;
}

const Login = (props: Props) => {
    /**
     * useEffect
     */
    useEffect(() => {
        if (props.body) {
            console.log(props.body);
            login(props.body.code);
        }
    }, [props.body]);

    /**
     * login
     */
    const login = async (code: string) => {
        const appleLogin: AppleLogin = {
            code,
        };

        const res = await axios.post('/api/apple/login', appleLogin);
        if (res.data) {
            console.log(res.data);
        }
    };

    return <></>;
};

export default Login;
SpringBoot
이번에는 SpringBoot를 활용하여 api 서버를 구성해 보겠습니다.
[ 1. 의존성 추가 ]
dependencies {
	implementation group: 'io.jsonwebtoken', name: 'jjwt', version: '0.9.1'
	implementation group: 'org.bouncycastle', name: 'bcpkix-jdk18on', version: '1.72'
	implementation group: 'com.nimbusds', name: 'nimbus-jose-jwt', version: '9.30.1'
}
[ 2. p8 파일 프로젝트에 복사 ]
위에서 Key 파일을 생성할 때 다운로드했었던 p8 파일을 프로젝트 경로로 이동하겠습니다.
저는 다음과 같이 /resources/keys 경로에 넣겠습니다.

[ 3. controller 구성 ]
이번엔 controller를 구성해 보겠습니다.
controller에 의해 만들어지는 api의 역할은 다음과 같습니다.
- client에서 전달해 준 code값이 올바른지 검증
- code값을 이용하여 apple token값 확인
- apple token값을 이용하여 로그인 사용자 이메일 정보 추출
코드는 다음과 같이 작성해 보겠습니다.
package com.apple.login.controller;

import com.apple.login.dto.AppleLogin;
import com.fasterxml.jackson.databind.ObjectMapper;
import com.nimbusds.jose.JWSVerifier;
import com.nimbusds.jose.crypto.RSASSAVerifier;
import com.nimbusds.jose.jwk.JWK;
import com.nimbusds.jose.jwk.RSAKey;
import com.nimbusds.jwt.SignedJWT;
import io.jsonwebtoken.Jwts;
import io.jsonwebtoken.SignatureAlgorithm;
import org.bouncycastle.asn1.pkcs.PrivateKeyInfo;
import org.bouncycastle.openssl.PEMParser;
import org.bouncycastle.openssl.jcajce.JcaPEMKeyConverter;
import org.springframework.http.HttpHeaders;
import org.springframework.http.MediaType;
import org.springframework.http.ResponseEntity;
import org.springframework.web.bind.annotation.PostMapping;
import org.springframework.web.bind.annotation.RequestBody;
import org.springframework.web.bind.annotation.RestController;
import org.springframework.web.reactive.function.client.WebClient;

import java.io.*;
import java.security.PrivateKey;
import java.security.interfaces.RSAPublicKey;
import java.util.*;

@RestController
public class AppleLoginController {

    /**
     * Apple Login에 사용되는 변수 (실 사용시엔 properties에서 관리하기)
     */
    private String appleUrl = "https://appleid.apple.com";
    private String appleKeyId = "389FGAM98S"; // Key 생성할 때 만들어진 Key ID
    private String appleKeyIdPath = "/keys/AuthKey_389FGAM98S.p8"; // Key 생성할 때 다운로드한 p8 파일 경로
    private String appleKey = "org.nextjs.jforj"; // Service IDs 생성할 때 등록한 identifer
    private String appleTeamId = ""; // App 생성할 때 등록된 App ID Prefix


    @PostMapping("/api/apple/login")
    public ResponseEntity<Object> appleLogin(@RequestBody AppleLogin appleLogin) throws Exception {
        /**
         * appleKeyId를 이용하여 privateKey 생성
         */

        // appleKeyId에 담겨있는 정보 가져오기
        InputStream inputStream = this.getClass().getClassLoader().getResourceAsStream(appleKeyIdPath);
        BufferedReader bufferedReader = new BufferedReader(new InputStreamReader(inputStream));
        String readLine = null;
        StringBuilder stringBuilder = new StringBuilder();
        while ((readLine = bufferedReader.readLine()) != null) {
            stringBuilder.append(readLine);
            stringBuilder.append("\n");
        }
        String keyPath = stringBuilder.toString();

        // privateKey 생성하기
        Reader reader = new StringReader(keyPath);
        PEMParser pemParser = new PEMParser(reader);
        JcaPEMKeyConverter jcaPEMKeyConverter = new JcaPEMKeyConverter();
        PrivateKeyInfo privateKeyInfo = (PrivateKeyInfo) pemParser.readObject();
        PrivateKey privateKey = jcaPEMKeyConverter.getPrivateKey(privateKeyInfo);

        /**
         * privateKey를 이용하여 clientSecretKey 생성
         */

        // headerParams 적재
        Map<String, Object> headerParamsMap = new HashMap<>();
        headerParamsMap.put("kid", appleKeyId);
        headerParamsMap.put("alg", "ES256");

        // clientSecretKey 생성
        String clientSecretKey = Jwts
                .builder()
                .setHeaderParams(headerParamsMap)
                .setIssuer(appleTeamId)
                .setIssuedAt(new Date(System.currentTimeMillis()))
                .setExpiration(new Date(System.currentTimeMillis() + 1000 * 30)) // 만료 시간 (30초)
                .setAudience(appleUrl)
                .setSubject(appleKey)
                .signWith(SignatureAlgorithm.ES256, privateKey)
                .compact();

        /**
         * code값을 이용하여 token정보 가져오기
         */

        // webClient 설정
        WebClient webClient =
                WebClient
                        .builder()
                        .baseUrl(appleUrl)
                        .defaultHeader(HttpHeaders.CONTENT_TYPE, MediaType.APPLICATION_JSON_VALUE)
                        .build();

        // token api 호출
        Map<String, Object> tokenResponse =
                webClient
                        .post()
                        .uri(uriBuilder -> uriBuilder
                                .path("/auth/token")
                                .queryParam("grant_type", "authorization_code")
                                .queryParam("client_id", appleKey)
                                .queryParam("client_secret", clientSecretKey)
                                .queryParam("code", appleLogin.getCode())
                                .build())
                        .retrieve()
                        .bodyToMono(Map.class)
                        .block();

        String idToken = (String) tokenResponse.get("id_token");

        /**
         * apple public key로 idToken을 복호화하여 사용자 이메일 정보 확인하기
         */

        // key api 호출
        Map<String, Object> keyReponse =
                webClient
                        .get()
                        .uri(uriBuilder -> uriBuilder
                                .path("/auth/keys")
                                .build())
                        .retrieve()
                        .bodyToMono(Map.class)
                        .block();

        List<Map<String, Object>> keys = (List<Map<String, Object>>) keyReponse.get("keys");

        // 가져온 public key 중 idToken을 암호화한 key가 있는지 확인
        SignedJWT signedJWT = SignedJWT.parse(idToken);
        for (Map<String, Object> key : keys) {
            RSAKey rsaKey = (RSAKey) JWK.parse(new ObjectMapper().writeValueAsString(key));
            RSAPublicKey rsaPublicKey = rsaKey.toRSAPublicKey();
            JWSVerifier jwsVerifier = new RSASSAVerifier(rsaPublicKey);

            // idToken을 암호화한 key인 경우
            if (signedJWT.verify(jwsVerifier)) {
                // jwt를 .으로 나눴을때 가운데에 있는 payload 확인
                String payload = idToken.split("[.]")[1];
                // public key로 idToken 복호화
                Map<String, Object> payloadMap = new ObjectMapper().readValue(new String(Base64.getDecoder().decode(payload)), Map.class);
                // 사용자 이메일 정보 추출
                String email = payloadMap.get("email").toString();

                // 결과 반환
                return ResponseEntity.ok(email);
            }
        }

        // 결과 반환
        return null;
    }
}
테스트
코드를 위와 같이 모두 작성한 뒤 각자 사용하실 서버를 구성하여 배포해 주시면 됩니다.
배포가 완료된 뒤 버튼을 구성한 페이지에 들어가 줍니다.

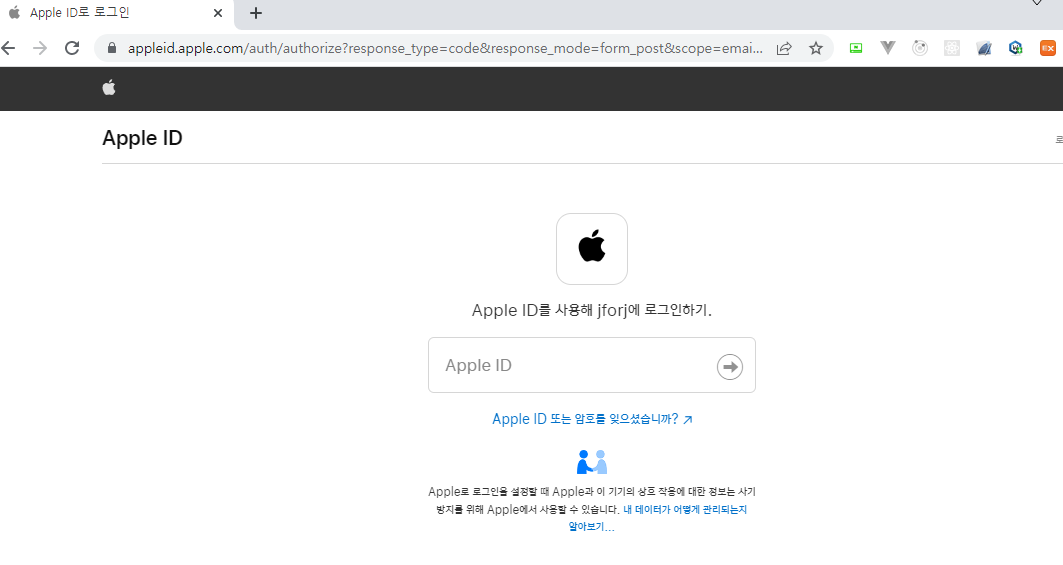
여기서 로그인 버튼을 클릭하면 다음과 같이 애플 로그인 페이지로 이동이 되고 로그인을 해주시면 됩니다.

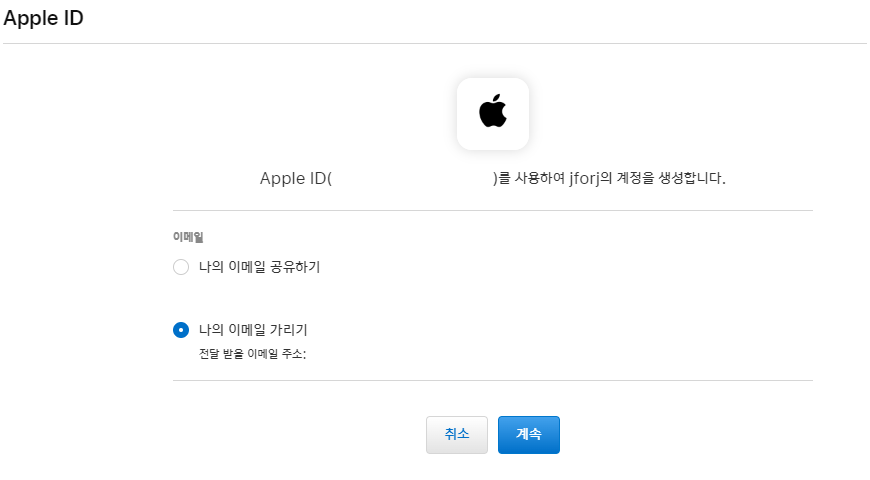
서비스에 처음 로그인을 하는 경우 다음과 같이 이메일 공유 여부에 대해 선택하는 화면이 나옵니다.
나의 이메일 공유하기를 선택하면 로그인한 이메일 원본을 추출할 수 있고 반대로 나의 이메일 가리기를 선택하면 암호화가 이루어진 이메일을 추출할 수 있습니다.
자유롭게 선택한 뒤 계속을 눌러줍니다.

그러면 Return URLs에 등록했던 redirect page로 이동이 되며 해당 파일에 구현해 놓은 것처럼 code값을 body에서 확인하여 api 서버에 전달하게 됩니다.
그리고 해당 로직에 대한 결과를 다음과 같이 콘솔에서 확인할 수 있습니다.

먼저 위에 찍힌 Object는 request body에 담겨있는 데이터입니다.
body에는 code값과 user값을 확인할 수 있는데 user 같은 경우는 사용자가 처음 로그인할 때만 값이 전달되며 이후에는 다시 로그인을 하는 경우 code값만 전달이 됩니다.
다음으로 아래에 찍힌 문자열은 code값을 api 서버에 전달한 뒤 해당 값을 이용하여 로그인한 사용자의 이메일 주소를 추출하여 결과를 반환해 준 겁니다.
값을 확인해 보면 request body에 담겨있는 이메일 값과 동일한 것을 확인할 수 있습니다.
이상으로 apple 로그인 spring 활용하여 구현하는 방법에 대해 간단하게 알아보는 시간이었습니다.
읽어주셔서 감사합니다.
'SPA > Next' 카테고리의 다른 글
| [Next] Naver 로그인 Spring을 활용하여 구현하기 (0) | 2023.04.02 |
|---|---|
| [Next] Kakao 로그인 Spring을 활용하여 구현하기 (0) | 2023.03.26 |
| [Next] Data Fetching에 대해 알아보기 (4) - useQuery (0) | 2023.03.05 |
| [Next] Data Fetching에 대해 알아보기 (3) - ISR (0) | 2023.02.20 |
| [Next] Data Fetching에 대해 알아보기 (2) - SSG / Dynamic Routing (0) | 2023.02.17 |


댓글