안녕하세요. J4J입니다.
이번 포스팅은 팩토리 메서드 (Factory Method) 패턴에 대해 적어보는 시간을 가져보려고 합니다.
Factory Method 패턴이란?
factory method 패턴은 객체 생성을 상위 클래스가 아닌 하위 클래스에서 생성하도록 도와주는 패턴으로 하위 클래스에 의해 어떤 객체가 생성될지 결정되는 디자인 패턴입니다.
factory method 패턴을 이해하기 위해선 하위 클래스에서 어떻게 생성을 할 수 있는지를 파악해야 합니다.
일반적으로 특정 객체를 생성하려고 한다면 new 연산자를 이용하여 객체들을 생성할 것입니다.
그리고 서로 다른 객체이지만 동일한 클래스를 사용해야 되는 경우 자연스럽게 다음과 같은 코드가 작성될 것입니다.
Product productA = new Product();
Product productB = new Product();
보통 위와 같이 객체를 생성할 경우 불편하거나 문제점이 발생한다고 생각될 부분은 존재하지 않을 것입니다.
하지만 예를 들어 product 객체가 가지고 있는 내부 메서드가 존재할 때, 해당 메서드는 어떤 형태의 product 인지에 따라 서로 다른 결과를 보여줘야 된다고 가정해 보겠습니다.
그럴 경우 예상되는 소스 코드는 다음과 같게 됩니다.
public void method() {
    switch(type) {
        // A 타입 정의
        // B 타입 정의
        // ...
    }
}
해당 코드도 매우 자연스러운 코드로서 판단될 수 있습니다.
그러나 만약 위와 같은 메서드가 다양하게 존재하면 if-else 또는 switch-case 등을 이용한 분기 처리가 점점 많아지게 될 것입니다.
또한 이런 상황에서 새로운 타입이 추가되는 경우 관련된 모든 메서드에 변경 사항이 항상 발생합니다.
즉, 새롭게 추가되는 기능이 있을 때 항상 모든 기능들을 테스트해 봐야 되고 예상치 못한 side effect를 발생시킬 확률이 높아집니다.
결국 확장성이 떨어지며 코드 수정에 대한 복잡도가 늘어나는 결과를 만듭니다.
factory method 패턴은 위와 같은 상황을 고려하여 효율적인 기능 확장을 할 수 있도록 도와줍니다.
factory method 패턴을 사용할 땐 크게 2가지 개념에 대해 알고 있어야 합니다.
- Creator → 객체를 생성하는 공장으로 추상화를 이용하여 객체 별 Creator를 생산
- Product → 공장에 의해 생성되는 객체로 추상화를 이용하여 생성될 객체들을 각각 정의
또한 factory method의 기본 구조는 다음과 같습니다.
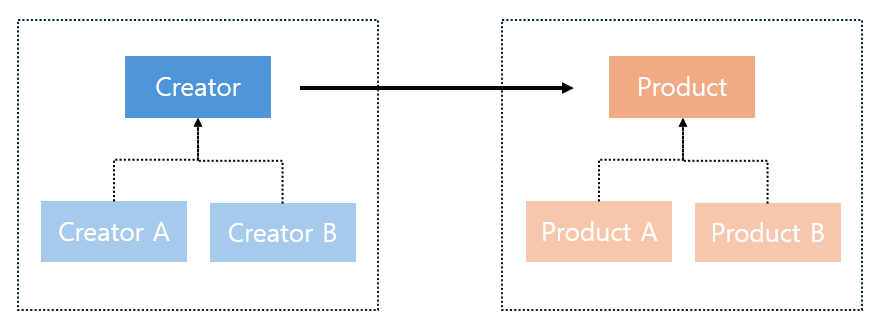
factory method의 원리에 대해서 간단하게 설명하자면 다음과 같습니다.
- Product라는 추상 클래스를 생성합니다.
- Product를 상속받아 타입 별로 원하는 객체만큼 생성합니다.
- Creator라는 추상 클래스는 객체 생성을 하기 위한 기본 설정들을 정의하고 객체 생성 메서드를 추상화합니다.
- Creator를 상속 받아 생성되어야 할 객체만큼 Creator를 정의하고 상속받은 객체 생성 메서드를 정의합니다.
이런 원리를 통해 새로운 타입이 추가되더라도 기존 소스 코드에 영향을 주지 않고 안전하게 기능 추가를 할 수 있도록 도와줍니다.
즉, 확장성과 유연성이 높아지는 결과를 가져옵니다.
Factory Method 패턴 특징
factory method 패턴의 특징은 다음과 같습니다.
[ 장점 ]
- 추가 기능이 필요할 때 기존 구현되어 있는 기능을 고려할 필요가 없음
- 기능 추가에 대해 예상치 못한 side effect가 발생하지 않음
- 코드 수정에 대한 복잡도가 줄어들며 유연한 개발을 가능하도록 도와줌
- 새로운 객체 생성을 위한 확장성이 높아짐
- 하위 클래스에 의해 객체가 생성되기에 정보 은닉이 가능
[ 단점 ]
- 객체가 필요한 만큼 클래스 파일의 개수가 방대해짐
- 단순 객체를 생성할 때 불필요한 오버헤드를 증가시킴
- 클래스들이 복잡하게 얽혀 구조를 이해하기 어렵게 만들 수 있음
factory method 패턴의 특징을 살펴보면 solid 패턴 중 ocp를 생각해 볼 수 있습니다.
즉, 확장에 열려있고 수정에는 닫혀있기 위한 구조를 잡을 때 factory method 패턴을 활용한다면 ocp 원칙을 준수하며 코드를 작성할 수 있게 됩니다.
또한 객체를 생성하기 위한 creator들이 각각 존재하기 때문에 solid 패턴 중 srp 원칙도 준수하며 코드가 작성됩니다.
Factory Method 패턴 예시 (1) - Before
factory method 패턴에 대해 간단히 예시를 작성해 보겠습니다.
먼저 factory method 패턴을 적용하지 않을 때입니다.
도형과 관련된 여러 객체를 생성해야 하는 경우 다음과 같이 코드를 작성할 수 있습니다.
// shape
package com.jforj.factorymethod.before;

public class Shape {

    private String type;
    private String color;

    public Shape(String type) {
        this.type = type;
        init();
    }

    private void init() {
        // 공통 초기화
        System.out.println("start init.");

        // type별 초기화
        switch (type) {
            case "circle": {
                this.color = "red";
                break;
            }

            case "rectangle": {
                this.color = "blue";
                break;
            }
        }
    }

    public void printShape() {
        // type별 출력
        switch (type) {
            case "circle": {
                System.out.println("this is circle.");
                break;
            }

            case "rectangle": {
                System.out.println("this is rectangle.");
                break;
            }
        }

        // 공통 출력
        System.out.println("color is " + this.color);
    }
}


// main
package com.jforj.factorymethod.before;

public class Main {
    public static void main(String[] args) {
        Shape circle = new Shape("circle");
        Shape rectangle = new Shape("rectangle");

        circle.printShape();
        rectangle.printShape();
    }
}
그리고 여기서 새로운 유형이 추가되는 경우도 고려해 보겠습니다.
새로운 유형을 추가하게 된다면 기존 작성되어 있는 코드들을 모두 수정하여 다음과 같이 변경할 수 있습니다.
// shape
package com.jforj.factorymethod.before;

public class Shape {

    private String type;
    private String color;

    public Shape(String type) {
        this.type = type;
        init();
    }

    private void init() {
        // 공통 초기화
        System.out.println("start init.");

        // type별 초기화
        switch (type) {
            case "circle": {
                this.color = "red";
                break;
            }

            case "rectangle": {
                this.color = "blue";
                break;
            }

            case "square": {
                this.color = "green";
                break;
            }
        }
    }

    public void printShape() {
        // type별 출력
        switch (type) {
            case "circle": {
                System.out.println("this is circle.");
                break;
            }

            case "rectangle": {
                System.out.println("this is rectangle.");
                break;
            }

            case "square": {
                System.out.println("this is square.");
                break;
            }
        }

        // 공통 출력
        System.out.println("color is " + this.color);
    }
}


// main
package com.jforj.factorymethod.before;

public class Main {
    public static void main(String[] args) {
        Shape circle = new Shape("circle");
        Shape rectangle = new Shape("rectangle");
        Shape square = new Shape("square");

        circle.printShape();
        rectangle.printShape();
        square.printShape();
    }
}
코드를 보시면 이해되시는 것처럼 새로운 기능이 추가될 때 기존에 작성되어 있는 소스 코드가 모두 변경되야만 합니다.
소스 코드가 변경되는 것은 지극히 자연스러운 현상이지만 매번 추가가 될 때마다 모든 객체들을 확인해줘야 하는 문제점이 발생될 수 있습니다.
Factory Method 패턴 예시 (2) - After
이번엔 동일한 경우에 대해 factory metho 패턴을 적용하면 어떻게 코드가 변경되는지 확인해 보겠습니다.
먼저 square가 추가되기 이전 코드는 다음과 같습니다.
// shape
package com.jforj.factorymethod.after;

public abstract class Shape {

    protected String type;
    protected String color;

    void print() {
        // 공통 출력
        System.out.println("color is " + this.color);
    }

    abstract void printShape();
}


// circle
package com.jforj.factorymethod.after;

public class Circle extends Shape {

    public Circle() {
        // type별 초기화
        this.type = "circle";
        this.color = "red";
    }

    @Override
    public void printShape() {
        // type별 출력
        System.out.println("this is circle.");

        // 공통 출력
        print();
    }
}


// rectangle
package com.jforj.factorymethod.after;

public class Rectangle extends Shape {

    public Rectangle() {
        // type별 초기화
        this.type = "rectangle";
        this.color = "blue";
    }

    @Override
    public void printShape() {
        // type별 출력
        System.out.println("this is rectangle.");

        // 공통 출력
        print();
    }
}


// shape factory
package com.jforj.factorymethod.after;

public interface ShapeFactory {

    default Shape getInstance() {
        // 공통 초기화
        System.out.println("start init.");
        return createShape();
    }

    Shape createShape();
}


// circle factory
package com.jforj.factorymethod.after;

public class CircleFactory implements ShapeFactory {

    @Override
    public Shape createShape() {
        return new Circle();
    }
}


// rectangle factory
package com.jforj.factorymethod.after;

public class RectangleFactory implements ShapeFactory {

    @Override
    public Shape createShape() {
        return new Rectangle();
    }
}


// main
package com.jforj.factorymethod.after;

public class Main {
    public static void main(String[] args) {
        Shape circle = new CircleFactory().getInstance();
        Shape rectangle = new RectangleFactory().getInstance();

        circle.printShape();
        rectangle.printShape();
    }
}
여기서 동일하게 square를 추가해 보겠습니다.
그러면 이전과 달리 기존 소스 코드에는 변경점이 발생되지 않고 새로운 기능에 대해서만 추가해 주면 되는 것을 확인할 수 있습니다.
// shape (이전과 동일)
// circle (이전과 동일)
// rectangle (이전과 동일)
// square
package com.jforj.factorymethod.after;

public class Square extends Shape {

    public Square() {
        // type별 초기화
        this.type = "square";
        this.color = "green";
    }

    @Override
    public void printShape() {
        // type별 출력
        System.out.println("this is square.");

        // 공통 출력
        print();
    }
}


// shape factory (이전과 동일)
// circle factory (이전과 동일)
// rectangle factory (이전과 동일)
// square factory
package com.jforj.factorymethod.after;

public class SquareFactory implements ShapeFactory {

    @Override
    public Shape createShape() {
        return new Square();
    }
}


// main
package com.jforj.factorymethod.after;

public class Main {
    public static void main(String[] args) {
        Shape circle = new CircleFactory().getInstance();
        Shape rectangle = new RectangleFactory().getInstance();
        Shape square = new SquareFactory().getInstance();

        circle.printShape();
        rectangle.printShape();
        square.printShape();
    }
}
이처럼 새로운 기능에 대해 열려 있고 수정에는 닫혀 있기 때문에 ocp 원칙을 준수할 수 있는 것을 볼 수 있습니다.
하지만 ocp 원칙이 준수되는 만큼 위에서 설명했던 단점들을 명확히 확인할 수 있기 때문에 단순 객체를 생성하는 상황에서는 factory method 패턴을 사용하는 것은 권장하지 않습니다.
이상으로 팩토리 메서드 (Factory Method) 패턴에 대해 간단하게 알아보는 시간이었습니다.
읽어주셔서 감사합니다.
'설계 > 디자인패턴' 카테고리의 다른 글
| [디자인패턴] 추상 팩토리(Abstract Factory) 패턴 이해하기 (0) | 2024.04.28 |
|---|---|
| [디자인패턴] 템플릿 메서드(Template Method) 패턴 이해하기 (0) | 2024.04.22 |
| [디자인패턴] 퍼사드(Facade) 패턴 이해하기 (0) | 2024.04.01 |
| [디자인패턴] 싱글톤(Singleton) 패턴 이해하기 (0) | 2024.03.30 |
| [디자인패턴] 빌더(Builder) 패턴 이해하기 (2) | 2024.03.23 |


댓글