안녕하세요. J4J입니다.
이번 포스팅은 MultipartRequest를 이용한 파일 업로드에 대해 적어보는 시간을 가져보려고 합니다.
이전 포스팅에서 MultipartFile을 이용한 파일 업로드에 대해 다뤘었는데 개인적으로 MultipartFile이 유동적으로 적용하기가 더 편리하게 느껴지고 또한 자세히 알아본 것은 아니지만 MultipartFile이 더 최신 기능인 것 같습니다.
한 마디로, 새롭게 파일 업로드 기능을 구현하고자 한다면 MultipartFile 사용을 추천합니다.
그럼에도 불구하고 MultipartRequest에 대해 포스팅을 하는 이유는 오래 지속되어온 시스템들엔 MultipartRequest를 사용하고 있을 수도 있기 때문에 추가적인 작업을 진행하시는 분들에게 도움이 되고자 작성하게 되었습니다.
그리고... 제가 그런 사람들 중 한명이라고는 말하진 않았습니다......ㅎㅎ
적용 방법
※ 스프링과 관련된 코드는 모두 STS-3.9.12.RELEASE 버전을 기준으로 작성되었습니다.
[ 1. pom.xml에 dependency 추가 ]
<!-- File Upload -->
<dependency> <!-- 파일 업로드를 위한 dependency -->
	<groupId>commons-fileupload</groupId>
	<artifactId>commons-fileupload</artifactId>
	<version>1.4</version>
</dependency>

<!-- Data Binding -->
<dependency> <!-- JSON 데이터 처리를 위한 dependency -->
	<groupId>com.fasterxml.jackson.core</groupId>
	<artifactId>jackson-databind</artifactId>
	<version>2.9.8</version>
</dependency>
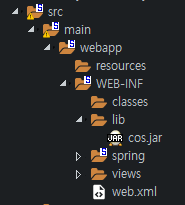
[ 2. jar 파일 /WEB-INF/lib에 추가 (maven으로 하는 방법은 잘 모르겠습니다) ]

[ 3. build path에 cos.jar 등록 ]
[ 3-1. 프로젝트 우클릭 → Build Path → Configure Build Path... ]

[ 3-2. Libraries탭 → Add JARs... → cos.jar 경로를 찾아서 OK ]

[ 3-3. 추가 확인 후 Apply and Close ]

[ 4. 화면에서 파일과 함께 전달받을 DTO 클래스 생성 (com.spring.multipartRequest.dto.Food) ]
package com.spring.multipartRequest.dto;

public class Food {
	private String name;
	private int price;

	public String getName() {
		return name;
	}

	public void setName(String name) {
		this.name = name;
	}

	public int getPrice() {
		return price;
	}

	public void setPrice(int price) {
		this.price = price;
	}

	@Override
	public String toString() {
		return "Food [name=" + name + ", price=" + price + "]";
	}
}
[ 5. Controller 클래스 생성 (com.spring.multipartRequest.controller.MyController) ]
package com.spring.multipartRequest.controller;

import java.io.File;
import java.io.IOException;
import java.util.Date;
import java.util.Enumeration;
import java.util.Random;

import javax.servlet.http.HttpServletRequest;

import org.apache.commons.io.FileUtils;
import org.springframework.http.HttpStatus;
import org.springframework.http.ResponseEntity;
import org.springframework.web.bind.annotation.CrossOrigin;
import org.springframework.web.bind.annotation.PostMapping;
import org.springframework.web.bind.annotation.RestController;

import com.fasterxml.jackson.databind.ObjectMapper;
import com.oreilly.servlet.MultipartRequest;
import com.spring.multipartRequest.dto.Food;

@RestController
@CrossOrigin("*") // 모든 출처에 대해 오픈 (CORS)
public class MyController {

	@PostMapping("/uploadFiles")
	public ResponseEntity<Object> uploadFiles(HttpServletRequest request) {
		String TEMP_PATH = "F:\\myUpload"; // 임시로 저장 할 경로
		String UPLOAD_PATH = "F:\\myUpload\\realPath"; // 실제로 업로드 할 경로
		int MAX_SIZE = 300 * 1024 * 1024; // 파일 다운로드 할 수 있는 최대 크기, 300MB

		try {
			File file = new File(TEMP_PATH);
			if(!file.exists()) { // 파일 경로가 존재하지 않을 경우
				file.mkdirs(); // 파일 경로 만들기
			}

			MultipartRequest multipart = new MultipartRequest(request, TEMP_PATH, MAX_SIZE, "UTF-8"); // 임시 경로에 파일 업로드

			Food food = new ObjectMapper().readValue(multipart.getParameter("stringFood"), Food.class); // String to JSON

			Enumeration<String> fileEnum = multipart.getFileNames(); // 넘어온 파일 key값들
			while(fileEnum.hasMoreElements()) {
				String fileName = fileEnum.nextElement(); // 클라이언트에서 넣은 파일 key값, ex) file0, file1, file2 ...

				String fileId = (new Date().getTime()) + "" + (new Random().ints(1000, 9999).findAny().getAsInt()); // 현재 날짜와 랜덤 정수값으로 새로운 파일명 만들기
				String originName = multipart.getOriginalFileName(fileName); // ex) 파일.jpg
				String fileExtension = originName.substring(originName.lastIndexOf(".") + 1); // ex) jpg
				originName = originName.substring(0, originName.lastIndexOf(".")); // ex) 파일
				long fileSize = multipart.getFile(fileName).length(); // 파일 사이즈

				File tempPath = FileUtils.getFile(TEMP_PATH + "/" + (originName + "." + fileExtension)); // 임시로 저장한 경로
				File realPath = FileUtils.getFile(UPLOAD_PATH + "/" + (fileId + "." + fileExtension)); // 실제 저장할 경로
				FileUtils.moveFile(tempPath, realPath); // 임시 경로에서 실제 저장할 경로로 파일 옮기기, 폴더 없을 경우 자동으로 생성

				System.out.println("fileId= " + fileId);
				System.out.println("originName= " + originName);
				System.out.println("fileExtension= " + fileExtension);
				System.out.println("fileSize= " + fileSize);
			}

			System.out.println("food= " + food);
		} catch (IOException e) {
			return new ResponseEntity<Object>(null, HttpStatus.CONFLICT);
		}

		return new ResponseEntity<Object>("Success", HttpStatus.OK);
	}
}
MultipartRequest는 메서드 파라미터 값으로 request만 받아오며 request를 이용하여 multipart를 생성합니다.
그리고 multipart의 생성과 동시에 지정된 경로로 파일을 바로 업로드하기 때문에 파일 이름을 변경하고 싶거나 일부 작업을 한 이후에 파일경로가 정해지는 경우에는 파일 위치를 옮겨주는 작업을 추가적으로 해야합니다.
참고적으로 하나 더 말씀드리면 MultipartRequest를 import할 때 스프링에서 제공해주는 Multipart가 아니라 추가한 jar에서 가져오는 oreilly관련 Multipart를 import해야 합니다.
React 코드 및 실행 화면
클라이언트 구성을 위한 부분은 React + Typescript를 이용하여 구현했습니다.
참고하실 분들만 참고하시면 될 것 같습니다.
import * as React from 'react';
import axios from 'axios';

const myPage = (): JSX.Element => {
    const fileList: File[] = [];

    const onSaveFiles = (e: React.ChangeEvent<HTMLInputElement>) => {
        const files: FileList | null = e.target.files;
        const fileArray = Array.prototype.slice.call(files);

        fileArray.forEach((file) => {
            fileList.push(file);
        });
    };

    const onFileUpload = async () => {
        const formData = new FormData();

        fileList.forEach((file, index) => {
            formData.append(`file${index}`, file); // 파일마다 담는 이름을 모두 다르게 해야함
        });

        const Food = {
            name: '피자',
            price: 13500,
        };

        formData.append('stringFood', JSON.stringify(Food));

        const res = await axios.post('http://localhost:8080/multipartRequest/uploadFiles', formData);

        console.log(res.data);
    };

    return (
        <div>
            <input type="file" multiple onChange={onSaveFiles} />
            <button onClick={onFileUpload}>파일 업로드</button>
        </div>
    );
};

export default myPage;
MultipartFile과 약간의 차이점을 말씀드리자면 MultipartFile은 FormData에 값을 담을 때 key값을 동일하게 해서 담지만 MultipartRequest는 key값을 모두 달리하여 담아야 모든 파일이 정상적으로 넘어갑니다.
코드에서 작성된 formData.append(`file${index}`, file)부분은 file0에 첫 번째 파일, file1에 두 번째 파일, file2에 세 번째 파일, ... , file(n-1)에 n번째 파일을 담는다는 것을 의미합니다.
또한 JSON데이터를 stirngify를 이용하여 문자열로 변환 후 담는 이유는 파일 데이터와 JSON데이터를 같이 못 보내기 때문에 문자열로 변경하여 스프링에 전달한 뒤 스프링에서 문자열을 클래스로 변경하는 작업을 수행해야 됩니다.
작성한 리액트를 실행하면 다음과 같은 화면이 나옵니다.

파일 선택 버튼을 눌러 미리 만들어 둔 윈도우와 알집 사진을 선택해보겠습니다.

파일을 선택한 뒤 파일 업로드 버튼을 누르면 스프링으로 데이터가 전달되며 다음과 같이 콘솔 창에 출력됩니다.
fileId= 16149422274714425
originName= 윈도우모양
fileExtension= PNG
fileSize= 110725
fileId= 16149422275063946
originName= 알집사진
fileExtension= PNG
fileSize= 3798
food= Food [name=피자, price=13500]
지정된 파일 경로를 확인해보겠습니다.
임시 경로였던 F:\\myUpload에는 폴더만 있고 파일이 없는 것을 확인할 수 있습니다. (스프링에서는 \를 하나 더 붙여야 됩니다.)

그리고 실제 저장 경로인 F:\\myUpload\\realPath에는 업로드를 원했던 파일이 있는 것을 확인할 수 있습니다.

만약 스프링에서 moveFile메서드를 사용하지 않는다면 임시 경로에 기존의 파일 이름으로 파일이 저장되어 있는 것을 확인하실 수 있습니다.
이상으로 MultipartRequest를 이용한 파일 업로드에 대해 간단하게 알아보는 시간이었습니다.
읽어주셔서 감사합니다.
'Spring > Spring' 카테고리의 다른 글
| [Spring] JNDI를 이용한 Tomcat에 Datasource 구성 (3) | 2021.04.04 |
|---|---|
| [Spring] MyBatis ↔ Repository를 연결하는 다양한 방법들 (1) | 2021.03.16 |
| [Spring] 파일 업로드 - MultipartFile(With. React) (0) | 2021.03.04 |
| [Spring] Swagger (0) | 2021.03.03 |
| [Spring] Lombok (0) | 2021.03.02 |


댓글