개요
안녕하세요. J4J입니다.
이번 포스팅은 Filter와 Interceptor에 대해 적어보는 시간을 가져보려고 합니다.
Filter와 Interceptor의 역할
스프링에서 필터와 인터셉터의 역할은 공통 코드 처리입니다.
스프링을 이용하여 개발하다 보면 모든 클래스 파일 또는 일부분의 클래스 파일에 공통적으로 적용시켜야 하는 코드가 생길 수 있습니다.
파일마다 따로 적용시켜도 문제 될 것은 없지만 코드를 수정하는 등의 유지보수 작업에 있어 비효율적이기 때문에 필터와 인터셉터를 이용하여 하나의 코드만 작성해도 적용하고자 하는 파일에 모두 적용시키도록 할 수 있습니다.
실행 흐름
필터와 인터셉터의 흐름은 다음과 같습니다.

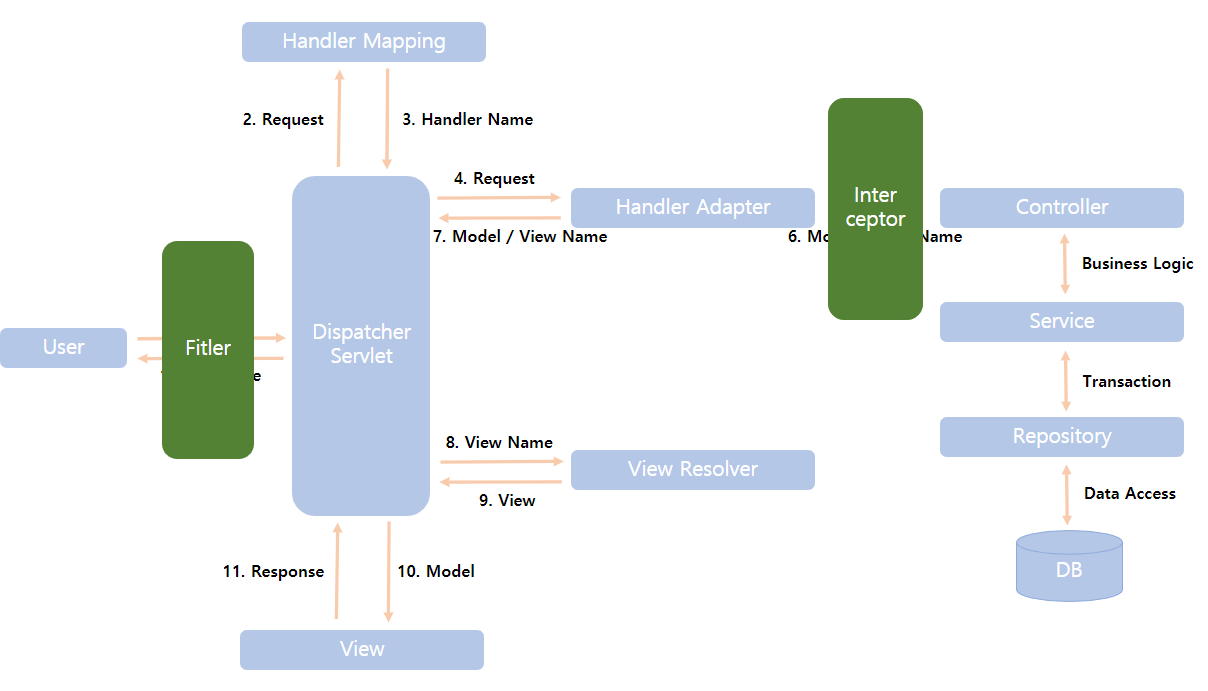
필터가 실행되는 위치는 dispatcher servlet에 사용자의 request가 도달하기 전이고 인터셉터가 실행되는 위치는 컨트롤러가 실행되기 전입니다.
필터에서는 공통 코드를 처리한 뒤 doFilter메서드를 이용하여 그 이후의 실행을 진행하고 인터셉터에서는 preHandle메서드에 컨트롤러가 실행되기 이전의 공통 코드를 작성, postHandle메서드에 컨트롤러가 실행된 이후의 공통 코드를 작성합니다.
추가적으로 이전 포스팅들에서 사용되었던 스프링 MVC구조에 필터와 인터셉터의 위치를 추가해보면 다음과 같은 구조가 나옵니다.

처리되는 기능
필터를 이용하여 처리되는 기능들은 인코딩, XSS 방지 등의 보안 작업 등이 있습니다.
이전 포스팅에서도 한글 데이터가 정상적으로 표현되도록 인코딩 설정을 했었는데 그때 설정했던 것이 필터를 적용시켰던 것입니다.
인터셉터를 이용하여 처리되는 기능들은 권한 체크, 로그인 관련 처리(세션, 토큰) 등이 있습니다.
예를 들어 네이버에 로그인을 한 뒤 웹 페이지를 종료했다가 다시 접속할 경우 로그인이 유지되고 있던 경험이 있으실 겁니다.
이런 경우들이 로그인 관련 처리에 해당되는 것으로 초기에 접속했을 때 생성된 세션이나 토큰이 남아있어 이후에 다시 페이지에 접근할 때 생성되었던 세션이나 토큰을 이용하여 자동 로그인을 할 수 있도록 처리하는 것입니다.
프로젝트 설정 (공통)
※ 스프링과 관련된 코드는 모두 STS-3.9.12.RELEASE 버전을 기준으로 작성되었습니다.
스프링에 필터와 인터셉터를 등록하여 사용해보는 간단한 코드를 만들어 보겠습니다.
우선 공통적으로 사용되는 부분들을 설정해보겠습니다.
0. 프로젝트 초기 설정 (프로젝트 명:filter_interceptor, 패키지 명: com.spring.filter_interceptor)
※ 참고: 2021/02/11 - [IT/Spring] - [Spring] 스프링을 이용한 MVC패턴 구현(2) - 프로젝트 초기 설정 방법
[ 1. servlet-context.xml 설정 ]
<?xml version="1.0" encoding="UTF-8"?>
<beans:beans xmlns="http://www.springframework.org/schema/mvc"
	xmlns:xsi="http://www.w3.org/2001/XMLSchema-instance"
	xmlns:beans="http://www.springframework.org/schema/beans"
	xmlns:context="http://www.springframework.org/schema/context"
	xsi:schemaLocation="http://www.springframework.org/schema/mvc https://www.springframework.org/schema/mvc/spring-mvc.xsd
		http://www.springframework.org/schema/beans https://www.springframework.org/schema/beans/spring-beans.xsd
		http://www.springframework.org/schema/context https://www.springframework.org/schema/context/spring-context.xsd">

    	...

	<context:component-scan base-package="com.spring.filter_interceptor.controller" /> <!-- 설정이 적용 될 컨트롤러 패키지 등록 -->
</beans:beans>
[ 2. 컨트롤러 클래스 생성 (com.spring.filter_interceptor.controller.MyController) ]
package com.spring.filter_interceptor.controller;

import org.springframework.stereotype.Controller;
import org.springframework.web.bind.annotation.GetMapping;

@Controller
public class MyController {

	@GetMapping("/")
	public String init() { // 초기 로드 시 myPage.jsp 로드
		return "myPage";
	}

	@GetMapping("/myPage")
	public String myPage() { // filter와 interceptor가 모두 적용되며 myPage.jsp 로드
		System.out.println("=== myPage load ===");
		return "myPage";
	}

	@GetMapping("/filter/myPage")
	public String filterMyPage() { // filter가 적용되며 myPage.jsp 로드
		System.out.println("=== filterMyPage load ===");
		return "myPage";
	}

	@GetMapping("/interceptor/myPage")
	public String interceptorMyPage() { // interceptor가 적용되며 myPage.jsp 로드
		System.out.println("=== interceptorMyPage load ===");
		return "myPage";
	}
}
[ 3. 사용자 화면 생성 (src/main/webapp/WEB-INF/views/myPage.jsp) ]
<%@ page language="java" contentType="text/html; charset=UTF-8"
    pageEncoding="UTF-8"%>
<!DOCTYPE html>
<html>
<head>
<meta charset="UTF-8">
<title>Insert title here</title>
</head>
<body>
	<div>
		<h2>MyPage</h2>

		<button><a href="/filter_interceptor/myPage">All</a></button> <!-- filter와 interceptor가 모두 적용되며 myPage.jsp 로드 -->
		<button><a href="/filter_interceptor/filter/myPage">Filter</a></button> <!-- filter가 적용되며 myPage.jsp 로드 -->
		<button><a href="/filter_interceptor/interceptor/myPage">Interceptor</a></button> <!-- interceptor가 적용되며 myPage.jsp 로드 -->
	</div>
</body>
</html>
프로젝트 설정 (Filter)
※ 스프링과 관련된 코드는 모두 STS-3.9.12.RELEASE 버전을 기준으로 작성되었습니다.
필터를 등록하는 파일은 web.xml입니다.
필터 처리될 코드를 구현한 뒤 web.xml파일에 등록하여 필터 처리가 되도록 해보겠습니다.
[ 1. 필터 클래스 생성 (com.spring.filter_interceptor.filter.MyFilter) ]
package com.spring.filter_interceptor.filter;

import java.io.IOException;

import javax.servlet.Filter;
import javax.servlet.FilterChain;
import javax.servlet.FilterConfig;
import javax.servlet.ServletException;
import javax.servlet.ServletRequest;
import javax.servlet.ServletResponse;
import javax.servlet.http.HttpServletRequest;

public class MyFilter implements Filter {

	@Override
	public void doFilter(ServletRequest request, ServletResponse response, FilterChain chain)
			throws IOException, ServletException { // 필터 처리 할 코드를 작성하는 곳
		String path = ((HttpServletRequest)request).getRequestURI();

		if(path.contains("/interceptor")) { // URI에 /interceptor가 포함될 시 아무처리 하지 않고 넘기기
			chain.doFilter(request, response);
		} else { // 필터처리한 뒤 넘기기
			System.out.println("=== " + path + ", MyFilter.doFilter Start ===");

			chain.doFilter(request, response);

			System.out.println("=== " + path + ", MyFilter.doFilter End ===");
		}
	}

	@Override
	public void init(FilterConfig filterConfig) throws ServletException { // 필터 생성될 경우
		System.out.println("=== MyFilter.init Start ===");
	}

	@Override
	public void destroy() { // 필터 사라질 경우
		System.out.println("=== MyFilter.destroy Start ===");
	}
}
[ 2. web.xml에 필터 등록 ]
<?xml version="1.0" encoding="UTF-8"?>
<web-app version="2.5" xmlns="http://java.sun.com/xml/ns/javaee"
	xmlns:xsi="http://www.w3.org/2001/XMLSchema-instance"
	xsi:schemaLocation="http://java.sun.com/xml/ns/javaee https://java.sun.com/xml/ns/javaee/web-app_2_5.xsd">

	...

	<filter>
		<filter-name>MyFilter</filter-name>
		<filter-class>com.spring.filter_interceptor.filter.MyFilter</filter-class>
	</filter>

	<filter-mapping>
		<filter-name>MyFilter</filter-name>
		<url-pattern>/*</url-pattern> <!-- 요청이 넘어오는 모든 URL에 MyFilter를 적용시키기 -->
	</filter-mapping>
</web-app>
프로젝트 설정 (Interceptor)
※ 스프링과 관련된 코드는 모두 STS-3.9.12.RELEASE 버전을 기준으로 작성되었습니다.
인터셉터를 등록하는 파일은 servlet-context.xml입니다.
인터셉터가 처리될 코드를 구현한 뒤 servlet-context.xml에 등록하여 인터셉터 처리가 적용되도록 해보겠습니다.
[ 1. 인터셉터 클래스 생성 (com.spring.filter_interceptor.interceptor.MyInterceptor) ]
package com.spring.filter_interceptor.interceptor;

import javax.servlet.http.HttpServletRequest;
import javax.servlet.http.HttpServletResponse;

import org.springframework.web.servlet.ModelAndView;
import org.springframework.web.servlet.handler.HandlerInterceptorAdapter;

public class MyInterceptor extends HandlerInterceptorAdapter {

	@Override
	public boolean preHandle(HttpServletRequest request, HttpServletResponse response, Object handler)
			throws Exception { // 컨트롤러에 접근하기 전에 처리되는 곳
		String path = ((HttpServletRequest)request).getRequestURI();

		System.out.println("=== " + path + ", MyIntercetor.preHandle Start ===");

		return true;
	}

	@Override
	public void postHandle(HttpServletRequest request, HttpServletResponse response, Object handler,
			ModelAndView modelAndView) throws Exception { // 컨트롤러 처리가 종료된 이후 처리되는 곳
		String path = ((HttpServletRequest)request).getRequestURI();

		System.out.println("=== " + path + ", MyIntercetor.postHandle Start ===");
	}
}
[ 2. servlet-context.xml에 인터셉터 등록 ]
<?xml version="1.0" encoding="UTF-8"?>
<beans:beans xmlns="http://www.springframework.org/schema/mvc"
	xmlns:xsi="http://www.w3.org/2001/XMLSchema-instance"
	xmlns:beans="http://www.springframework.org/schema/beans"
	xmlns:context="http://www.springframework.org/schema/context"
	xsi:schemaLocation="http://www.springframework.org/schema/mvc https://www.springframework.org/schema/mvc/spring-mvc.xsd
		http://www.springframework.org/schema/beans https://www.springframework.org/schema/beans/spring-beans.xsd
		http://www.springframework.org/schema/context https://www.springframework.org/schema/context/spring-context.xsd">

	...

	<beans:bean id="MyInterceptor" class="com.spring.filter_interceptor.interceptor.MyInterceptor" />

	<interceptors>
		<interceptor>
			<mapping path="/**"/> <!-- 모든 URL에 MyInterceptor 적용 -->
			<exclude-mapping path="/filter/**"/> <!-- /filter로 시작되는 URL에는 MyInterceptor 적용하지 않음 -->
			<beans:ref bean="MyInterceptor"/>
		</interceptor>
	</interceptors>
</beans:beans>
실행 화면
※ 스프링과 관련된 코드는 모두 STS-3.9.12.RELEASE 버전을 기준으로 작성되었습니다.
프로젝트를 실행할 경우 다음과 같은 화면이 나옵니다.

All버튼 누르게 되면 필터와 인터셉터가 모두 적용되어 STS의 콘솔 창에 다음과 같이 출력됩니다.
=== /filter_interceptor/myPage, MyFilter.doFilter Start ===
=== /filter_interceptor/myPage, MyIntercetor.preHandle Start ===
=== myPage load ===
=== /filter_interceptor/myPage, MyIntercetor.postHandle Start ===
=== /filter_interceptor/myPage, MyFilter.doFilter End ===
Filter버튼을 누르면 필터만 적용되어 STS의 콘솔 창에 다음과 같이 출력됩니다.
=== /filter_interceptor/filter/myPage, MyFilter.doFilter Start ===
=== filterMyPage load ===
=== /filter_interceptor/filter/myPage, MyFilter.doFilter End ===
Interceptor버튼을 누르면 인터셉터만 적용되어 STS의 콘솔 창에 다음과 같이 출력됩니다.
=== /filter_interceptor/interceptor/myPage, MyIntercetor.preHandle Start ===
=== interceptorMyPage load ===
=== /filter_interceptor/interceptor/myPage, MyIntercetor.postHandle Start ===
ServletContext 설정 파일 변경 (xml → Java)
※ 스프링과 관련된 코드는 모두 STS-3.9.12.RELEASE 버전을 기준으로 작성되었습니다.
servlet-context.xml파일을 Java파일로 변경한 뒤 인터셉터를 등록하여 사용해보겠습니다.
[ 1. servlet-context.xml 파일 수정 ]
<?xml version="1.0" encoding="UTF-8"?>
<beans:beans xmlns="http://www.springframework.org/schema/mvc"
	xmlns:xsi="http://www.w3.org/2001/XMLSchema-instance"
	xmlns:beans="http://www.springframework.org/schema/beans"
	xmlns:context="http://www.springframework.org/schema/context"
	xsi:schemaLocation="http://www.springframework.org/schema/mvc https://www.springframework.org/schema/mvc/spring-mvc.xsd
		http://www.springframework.org/schema/beans https://www.springframework.org/schema/beans/spring-beans.xsd
		http://www.springframework.org/schema/context https://www.springframework.org/schema/context/spring-context.xsd">

	<!-- java 방식 -->
	<context:annotation-config></context:annotation-config>
	<beans:bean class="com.spring.filter_interceptor.config.ServletContext"></beans:bean>

	<!-- xml 방식 -->
	<!--
	Enables the Spring MVC @Controller programming model
	<annotation-driven />

	Handles HTTP GET requests for /resources/** by efficiently serving up static resources in the ${webappRoot}/resources directory
	<resources mapping="/resources/**" location="/resources/" />

	Resolves views selected for rendering by @Controllers to .jsp resources in the /WEB-INF/views directory
	<beans:bean class="org.springframework.web.servlet.view.InternalResourceViewResolver">
		<beans:property name="prefix" value="/WEB-INF/views/" />
		<beans:property name="suffix" value=".jsp" />
	</beans:bean>

	<context:component-scan base-package="com.spring.filter_interceptor.controller" /> 설정이 적용 될 컨트롤러 패키지 등록

	<beans:bean id="MyInterceptor" class="com.spring.filter_interceptor.interceptor.MyInterceptor" />

	<interceptors>
		<interceptor>
			<mapping path="/**"/> 모든 URL에 MyInterceptor 적용
			<exclude-mapping path="/filter/**"/> /filter로 시작되는 URL에는 MyInterceptor 적용하지 않음
			<beans:ref bean="MyInterceptor"/>
		</interceptor>
	</interceptors>
	-->
</beans:beans>
[ 2. ServletContext 클래스 생성 (com.spring.filter_interceptor.config.ServletContext) ]
package com.spring.filter_interceptor.config;

import org.springframework.beans.factory.annotation.Autowired;
import org.springframework.context.annotation.Bean;
import org.springframework.context.annotation.ComponentScan;
import org.springframework.context.annotation.Configuration;
import org.springframework.web.servlet.ViewResolver;
import org.springframework.web.servlet.config.annotation.EnableWebMvc;
import org.springframework.web.servlet.config.annotation.InterceptorRegistry;
import org.springframework.web.servlet.config.annotation.ResourceHandlerRegistry;
import org.springframework.web.servlet.config.annotation.WebMvcConfigurer;
import org.springframework.web.servlet.view.InternalResourceViewResolver;

import com.spring.filter_interceptor.interceptor.MyInterceptor;

@Configuration // 설정파일로 등록
@EnableWebMvc // Spring MVC를 위한 설정
@ComponentScan(basePackages = {"com.spring.filter_interceptor.controller", "com.spring.filter_interceptor.interceptor"}) // 설정이 적용 될 패키지 등록
public class ServletContext implements WebMvcConfigurer {

	@Override
	public void addResourceHandlers(ResourceHandlerRegistry registry) { // /resources/**로 요청할 경우 ${webappRoot}/resources 탐색
	    registry.addResourceHandler("/resources/**").addResourceLocations("/resources/");
	}

	@Bean
	public ViewResolver viewResolver() { // View Resolver
		InternalResourceViewResolver vr = new InternalResourceViewResolver();
		vr.setPrefix("/WEB-INF/views/"); // view name 앞에 붙을 경로
		vr.setSuffix(".jsp"); // view name 뒤에 붙을 파일 확장자
		return vr;
	}

	@Autowired
	MyInterceptor myInterceptor;

	@Override
	public void addInterceptors(InterceptorRegistry registry) {
		registry.addInterceptor(myInterceptor)
				.addPathPatterns("/**") // 모든 URL에 MyInterceptor 적용
				.excludePathPatterns(new String[] {"/filter/**"}); // /filter로 시작되는 URL에는 MyInterceptor 적용하지 않음
	}
}
[ 3. 인터셉터 클래스 어노테이션 추가 (com.spring.filter_interceptor.interceptor.MyInterceptor) ]
package com.spring.filter_interceptor.interceptor;

import javax.servlet.http.HttpServletRequest;
import javax.servlet.http.HttpServletResponse;

import org.springframework.stereotype.Component;
import org.springframework.web.servlet.ModelAndView;
import org.springframework.web.servlet.handler.HandlerInterceptorAdapter;

@Component // 컴포넌트로 등록을 위한 어노테이션
public class MyInterceptor extends HandlerInterceptorAdapter {

	...

}
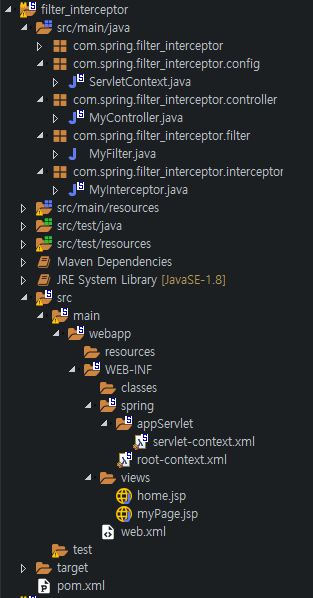
파일 구성

참조
[Spring] Filter, Interceptor, AOP 차이 및 정리
정리
이상으로 Filter와 Interceptor에 대해 간단하게 알아보는 시간이었습니다.
읽어주셔서 감사합니다.
'Spring > Spring' 카테고리의 다른 글
| [Spring] Swagger (0) | 2021.03.03 |
|---|---|
| [Spring] Lombok (0) | 2021.03.02 |
| [Spring] Rest API / @RestController(2) (0) | 2021.02.27 |
| [Spring] Rest API / @RestController(1) (2) | 2021.02.24 |
| [Spring] 스프링을 이용한 MVC패턴 구현(6) - JSP를 이용한 화면 구성 (0) | 2021.02.22 |


댓글